Hiển thị các bài đăng có nhãn Windows 10. Hiển thị tất cả bài đăng

Chủ Nhật, 18 tháng 10, 2015

How to reset Microsoft Edge in Windows 10 when things are broken

How to reset Microsoft Edge in Windows 10 when things are broken

In Windows 10, Microsoft is introducing many new features to make users more productive, such as a new Start menu, Cortana, new universal apps, Settings, which is the central place to configure the operating system, ultimately designed to replace Control Panel, and much more. The software giant is also introducing Microsoft Edge, the new default web browser built for the future web and to replace Internet Explorer (which it's still present for compatibility purposes).
Microsoft Edge is a completely new web browser with a minimal design that focus on web content, and like Chrome and Firefox, the software maker plans to match and surpass the features available from its competitors with extensions, web notes, tab preview, Cortana, and more.
While the web browser works quite alright without major problems, it's still in the early days. Some users may run into some issues, such as sudden crashes, slow performance, or simply it won't launch.
If you were running Chrome or Firefox, and you're having similar issues, you should try to uninstall and reinstall the web browser to try to resolve the problem. However, like Internet Explorer, Microsoft Edge is part of Windows 10. It's nearly impossible to uninstall the app, and even if you could, you might run into different issues.

If you are having problems with the new web browser, you can try resetting the instance of Microsoft Edge in your account to try to fix the issue you're having.
Of course, we would only recommend you do this as a last resort process, where you have tried everything else and nothing worked.

Warning: Using this guide might cause you lose your favorites, history, and settings. Before, you move forward, it's recommended that you perform a full backup or create a system restore point in case something goes wrong and to need to restore your last good known state of Windows 10.


Fixing Microsoft Edge

1- If you're running Microsoft Edge, close it.

2- Open File Explorer and type the following path into the address: 

C:\Users\UseYourUsername\AppData\Local\Packages and hit Enter. (Remember to replace "UseYourUsername" with your user account name.)


3- Select and try to delete the Microsoft.MicrosoftEdge_8wekyb3d8bbwe folder as you would with any other folder. If you get a "Folder Access Denied" prompt, simply click Continue. Also, there might be some content that you won't be able to delete. If this is the case, in the dialog box, select to skip the files.


You should be able to delete most of the content inside the folder, but if you can't right-click Microsoft.MicrosoftEdge_8wekyb3d8bbwe, select Properties, remove the check from the Read-only option, and click Apply and OK.


4- Once you've tried deleting all the content, go inside the Microsoft.MicrosoftEdge_8wekyb3d8bbwe folder and try deleting the remaining folders by selecting all the folders, right-clicking them, selecting Delete, and clicking Yes to confirm the deletion. You may notice that you can't delete AC folder, but that's alright.

5- Restart your computer.

6- Now, were going to re-register Microsoft Edge in your account. Open the Start menu, search for Windows PowerShell, right-click it from the result, and select Run as administrator.

7- Type the following command and hit Enter:
cd C:\Users\UseYourUsername. (Remember to replace "UseYourUsername" with your user account name.)

Then, type the following command exactly and hit Enter:

Get-AppXPackage -AllUsers -Name Microsoft.MicrosoftEdge | Foreach {Add-AppxPackage -DisableDevelopmentMode -Register "$($_.InstallLocation)\AppXManifest.xml" -Verbose}
If the process was completed successfully, you would see a message similar to this one:


That's all there is to it. If you want to be cautious, restart your computer one more time, and then you should be able to run Microsoft Edge again and hopefully without any issues.

Thứ Sáu, 16 tháng 10, 2015

How to configure the System Restore feature in Windows 10

How to configure the System Restore feature in Windows 10

We can safely customize many features and options in Windows without having to worry about if the next time you boot your computer will start correctly. Then there are those times when you need to modify the operating system in such a way that if you don't do it correctly, you might end up with serious problems. These problems could include not being able to boot, system stability problems, and many other issues.

This reason is why we always recommend you to protect your computer by doing a full backup of your system (or we tell you the risks involved doing a particular change). However, for years Microsoft's operating system has come with the System Restore feature, which can also help you fix your computer when things go wrong. System Restore allows you to revert the state of your computer to a previous point in time to undo changes that might have harmed your computer. These changes in the system files and settings, registry, and on installed applications. It's just like a time machine.

When enabled and configured correctly, Windows generates restore points when you install a new app, device driver, or Windows update, but, of course, you can always create a restore point manually. For example, when you want to change some of the Registry settings or install a big application.

This feature is like a backup, but not exactly, as going back in time with this feature won't affect your documents or settings prior the creation of a particular restore point. However, it will remove apps, drivers, system updates, and registry changes after the restore point was made.

Configuring System Restore hasn't been a difficult task to accomplish, but it's been a feature somewhat hidden from most users, even in Windows 10. Today we're going to go through the steps you need to follow to enable, create, and restore a system restore point in your computer.


Enable System Restore

1- Go to the Start menu, or click the search box and type Create a restore point and hit Enter to open the legacy "System Protection" settings page to configure the feature.


2- While in "System Properties" under the "System Protection" tab, make sure to check your Windows drive (typically C) has Protection turned On.

3- If Protection it's turned Off the Create button won't be available. The next step is to select the drive you have installed Windows (system) and click on the Configure button.


4- Once inside of "Restore Settings" make sure to select "Turn on system protection" to enable the feature.


Note: System Restore can only be enabled per supported drive, no per computer. If you have additional drives, you may not be able to configure them.

Under "Disk Space Usage," you can adjust the maximum storage space dedicated to storing restore points. By default, Windows only uses a small percentage of the total available storage of a particular drive, and as the reserved space fills up, older restore points will get deleted to make room for future ones.

You will also notice the a Delete button that will erase all the current saved restore points. You may want to use this option when you need to create a manual restore point, and you can't allocate more space.

5- After configuring your preferences, click Apply and then OK. Now, you'll see that under the system drive now has Protection turned On.

Create System Restore Point

Now that you have enabled Restore Point in your system, the operating system will create a restore point automatically every time a significant change happens. However, sometimes you might want to create a system restore point manually before modifying anything that you might think could cause a problem.

To configure a restore point manually, simply click the Create button, and type a description to help you identify the restore point (e.g., System Restore Point before installing X app). Then click the Create button to complete the process. (Restore points creation are fast, it shouldn't take longer than a minute.)


Using System Restore

If at any point in time, you run into issues, before using a backup or the "Reset this PC" feature in Windows 10, you can use a system restore point, which will be quicker and easier.

To undo unwanted system changes to fix your computer by going back to a previous point in time do the following:

1- Go to the Start menu, or click the search box and type Create a restore point and hit Enter to open the legacy "System Protection" settings page to configure the feature.
2- Click the System Restore button and click Next.


3- You will be shown all the available restore point available with date, description, and more importantly, you'll also see the type, which specifies if it was created manually or by the system.

As you select a restore point, you can click the "Scan for affected programs" to view the applications installed since the last restore point, which will be deleted during the restore process. Then click Cancel to go back to the wizard.


Then click Next and then Finish to begin the restore process.


Once the process complete, you will back to that point in time your system was working correctly.


Extra

Thus far, we have seen how to use a restore point when things go wrong in your system, but only when you can still operate the PC and OS. However, there will be a time when you have created a manual restore point, but your computer won't boot because a certain specific error after you have modified Windows.

In these cases, you use the system advanced options during boot to access the "System Restore". Simply, try to boot your computer three times to trigger the automatic repair environment in Windows 10, and then:


  1. Click on Advanced startup.
  2. Click on Troubleshoot, Advanced options, System Restore.
  3. System Restore will load, and you can use the previous steps from Using System Restore to restore your system.

Alternatively, you can use a bootable installation media of Windows 10 to start your system and then:


  1. Click Next, and click Repair your computer.
  2. Click on Troubleshoot, Advanced options, System Restore.
  3. System Restore will load, and you can use the previous steps from Using System Restore to restore your system.

That's all there is to it.

Wrapping things up

For years, System Restore has been a well-known feature, and it also comes as part of Windows 10. Like in previous versions, it's easy to use, but it could be somewhat difficult to find for regular users. As such, today we remind you of the feature for those times when you're eager to test a new configuration, but you don't know if it will work.

Keep in mind that this feature is not a replacement for a full backup or reset functionality. If your computer's hard drive fails, you won't be able to restore the previous version of the operating system, and you are likely to lose all your files. Also, the reset functionality built-in Windows 10 will only help when you need to reset all of your settings, apps, and operating system to the factory defaults.

Thứ Tư, 7 tháng 10, 2015

How to enter Windows 10's Safe Mode

How To Boot Into Windows 10 Safe Mode


Sometimes, whether you like it or not, you have to boot into Windows' stripped-down Safe Mode. But with Windows 10, that gets complicated. Windows’ Safe Mode provides a simple, stripped-down version of the operating system. The programs that usually load automatically when you boot Windows don’t do that here. And Safe Mode only uses the most generic drivers. Thus, Safe Mode can be a big help for diagnosing certain problems. For instance, it’s a great place to scan for malware. Plenty of discussions going around the Internet regarding Windows 10, mostly so because of how Microsoft has really revamped its latest OS setting it apart from the earlier offerings. If you’ve just moved onto Windows 10 and are experiencing boot failures due to some incompatible installations, such as drivers or apps, Safe Mode is your savior. We show you how to boot into Windows 10 Safe Mode.


But the old-fashioned way to get into Safe Mode—booting the PC and pressing F8 at the exact right moment—seldom works on PCs running Windows 10. These techniques will:
If you can successfully boot into Windows, booting into Safe Mode is relatively easy—if you know the trick.
Step1: Click or tap the Start button, and then the Power button. Hold down the Shift key when you select Restart.


Step2: In the resulting, full-screen menu , select Troubleshoot>Advanced options>Startup Settings.


Step 3: In the Startup Settings screen, tap the Restart button. The PC will reboot, and bring you to a Startup Settings screen. 
Step 4: Use the arrow keys on your keyboard to select Enable Safe Mode or Enable Safe Mode with Networking. But what if things are so bad that you can’t successfully boot the operating system?

Try booting anyway. If you can get to the login screen, you’ll find a power icon in the lower-right corner. The instructions above work there.
But what if you can’t get to the login screen? In that case, chances are that Windows is so messed up that it couldn’t boot into Safe Mode anyway. But here’s a trick that might work:
You’ll need the Windows 10 Recovery Drive, which you should make now, while your PC is still healthy. You’ll need a flash drive that you will use only for this purpose. Any files already on that drive will be deleted. To create the Recovery Drive, plug in the flash drive, open Control Panel’s Recovery tool, click Create a recovery drive, and follow the prompts.

You might want to test this before you’re in a difficult situation: Boot the Recovery Drive and select your keyboard layout. Then select Troubleshoot > Advanced options > Command Prompt. At the command prompt, enter these three lines, making sure to hit Enter at the end of each one:
c:
bcdedit /set {default} bootmenupolicy legacy
exit


Select Turn off your PC. Boot the computer and repeatedly press and release F8 until the Advanced Boot Options menu pops up. Then you can select Safe Mode or Safe Mode with Networking.

Or you can use

System Configuration Utility

Step 1: Right-click the Start button and select Run.
Step 2: Type msconfig in the Run box and hit Enter.
Step 3: Once System Configuration is launched, navigate to the Boot tab and check the Safe boot option under Boot options. Make sure Minimal is also selected as the sub-option. Additionally, if you wish to maintain network connectivity in Safe Mode, check the Network option.


Step 4: Once the options are all set, hit the OK or Apply button, and restart your computer, which should now boot straight into Safe Mode.

It is important to note that once you’re in Safe Mode, you will have to instruct Windows to not boot into Safe Mode upon next reboot. To do this, simply launch System Configuration again and ‘uncheck’ the Safe boot option.

Thứ Bảy, 3 tháng 10, 2015

How to manage Windows 10 devices from your Microsoft account

How to manage Windows 10 devices from your Microsoft account

Windows 10 isn't just an operating system that works locally in your computer. It's also an operating system that works in combination with Microsoft online services such as with Bing and OneDrive. Furthermore, in Windows 8, the software giant introduced the Microsoft account, leaving the old time local account as a secondary option.

A Microsoft account is a fairly new account type designed to allow users to connect across devices with a single username and password. When you sign in with a Microsoft account, all of your settings, passwords, people, documents, photos and videos, and music will roam with you everywhere to any device connected to a Microsoft service.


We are no longer tied to a single device. We have multiple hardware, and every time we connect new devices with our Microsoft account, they get registered into our account. While it's great to know that we can view how many devices we are using with our Microsoft account, it's important to keep the lists under control for various reasons:


  • If you have a Windows Phone connected to your Microsoft account, and you sell it, the other person won't be able to setup the Find my phone feature until you remove the device from your account.
  • In Windows 10, Microsoft is reducing the number of devices you can install an app or game you have purchased to only ten devices. On every new install of a Windows 10 device, you have been prompted to enable sync, which creates a backup of all your settings for each computer, phone, or tablet. This "backup" also gets stored in the cloud. If you ever reinstall Windows 10, you will be asked if you want to restore the settings from a previous install. After a while, these device backups will keep piling up, using valuable OneDrive space.


In this Windows 10 guide, we're going through the steps to keep the list of devices under control.

Removing devices you no longer use

If you used to own a Windows Phone, Surface Pro 3, or any other computer, you could remove these devices by going to "Your devices" in your Microsoft account online. Simply click the Remove link, check the box confirming the device you're removing, and click Remove.

Tip: If you're removing your old phone, you may also want to check your devices doesn't have Reset Protection enable.

Avoid reaching the ten devices app and game install limit

Windows 10 limits the install of an app or a game to 10 devices. To avoid reaching the limit, you can remove devices you no longer use. Simply go to Apps & games devices, and carefully remove the devices you want by clicking the Remove link, then check the box to confirm the device you're removing, and click Remove.


Note: It's worth pointing out that you can do the same for Music, Movies & TV devices.

Deleting old device backups from OneDrive

If you want to free up some of the storage space in OneDrive, keep your device backups organized, or you no longer have one of your devices, you can go to OneDrive > Device backups, and remove old backups by clicking the Delete button.


There you have it. These tips you see today will help you to keep your Windows 10 devices under control and keep enjoying apps and games.

Thứ Năm, 1 tháng 10, 2015

How to enable pop-up email notifications for Windows 10's Mail app

How to enable pop-up email notifications for Windows 10's Mail app

The built-in Mail app for Windows 10 isn’t the most full-featured email client you can find, but it’s a nice, light alternative to a web client. One thing you may be wondering, however, is why you aren’t seeing pop-up Action Center notifications when you receive new emails.
Easy! You have to turn them on first. But let me warn you: once you turn on notifications you’ll get notified for every mail message you receive. Firing up your PC in the morning means a barrage of new mail notifications that come in one by freakin' one.

Getting notified


To start, make sure app notifications are active. They should be by default, but let’s just check in case you turned them off. Open the Settings app and go to System > Notifications & Actions. Under “Notifications” make sure the slider for “Show app notifications” says “On.”
Next, scroll down to “Show notifications from these apps” and make sure the slider for Mail is also turned on.

Now open the Mail app, select the acocunt you want to see notifications for, and then click on the Settings cog at the bottom of the left-hand navigation panel.
A Settings panel will pop out from the right side. Select Options and scroll down to the “Notifications” section at the bottom. By default, the Show in action center slider will be turned on by default, but that just allows notifications to appear in the slide-out Action Center panel.

To actually see notifications as new messages roll in you have to check the box for “Show a notification banner” to see banners pop-out in the lower right corner of your screen. If you’d like to hear the Windows 10 chime each time you get a new notification click the box next to “Play a sound as well.”
Once that’s done, click away from the Options panel to make it disappear. That's it! Your Action Center notifications for the Mail app are ready to roll.
If you want to see notifications for multiple accounts, open that account’s inbox in the Mail, app, click the Settings cog and repeat the process above.

Thứ Hai, 28 tháng 9, 2015

Privacy and settings in Windows 10 and Microsoft Edge

Privacy and settings in Windows 10 and Microsoft Edge


In lieu of Microsoft's updated notes on user privacy in Windows 10, we're republishing this help and how-to guide for new users.
Microsoft's Windows 10 OS adds and simplifies many things for the user including security and privacy settings. Indeed, Windows 10 is both more secure and yet shares more data than any previous operating system.
The interesting part about security and privacy in Windows 10 is that Microsoft is very transparent on what data they collect, store, use and how they use it. Additionally, the company gives users many ways to opt-out of such data collection. The downside in a user doing this is it disables many of the OS personalization that makes Windows 10 so significant.
Let's break it all down.

Microsoft's Privacy Statement

Before we get started make sure you take a moment to read Microsoft's very public and thorough Privacy Statement : www.microsoft.com/privacystatement as well as a more general statement on Trustworthy Computing.
Microsoft is very clear on what they collect, why the collect it and what they do with it. It is up to you to decide what are the boundaries of acceptance and to know all the details. There are lots of interesting bits, though, and we will highlight a few by using the July 2015 terms for reference.

  1. Children and Advertising - Microsoft does not deliver interest-based advertising to children whose birthdate in their Microsoft account identifies them as under 13 years of age.
  2. Data Retention - For interest-based advertising, Microsoft retains data for no more than 13 months, unless they obtain your consent to retain the data longer.
  3. Data collected includes your name, how to contact, demographics, payment info, usage, contacts and relationships, location, and some content
  4. How Microsoft uses your personal data : providing services, service improvement, security, advertising


How to opt-out of interest-based advertising

To be clear, Microsoft is using this information for advertising, even for targeted marketing. In some ways, this is not a bad thing. If you have to see ads would you rather see something mildly interesting or something unrelated to your age or interests? I do not know. It is your preference.
Obviously no ads are the ideal but Microsoft is offering a lot of free services, and they are not immune to this popular business model. To wit:
"Many of our services are supported by advertising. We use the data we collect to help select the ads Microsoft delivers - whether on our own services or on services offered by third parties. The ads we select may be based on your current location, search query, or the content you are viewing. Other ads are targeted based on your likely interests or other information that we learn about you over time using demographic data, search queries, interests and favorites, usage data, and location data - which we refer to as "interest-based advertising" in this statement. Microsoft does not use what you say in email, chat, video calls or voice mail, or your documents, photos or other personal files to target ads to you."

That last point about not using your email is still a vital difference between Microsoft and other competitors in this area. Even if you opt-out of targeted advertising on Gmail you may still see "contextual ads based on the message you are reading as well as other relevant ads".

Luckily, you can easily opt-out of this Microsoft targeted marketing at choice.microsoft.com. At that site, you can choose to turn off personalized ads for your browser and your Microsoft Account.
Mind you, no matter what you choose you still see ads. The option merely chooses between ones relevant to your interests or wild guesses. If you decide to opt-out, do not be shocked to see ads for senior services even if you are in 20's.
Ironically, choosing to turn off 'Personalized ads in this browser' does not work in Microsoft Edge, or rather, it does not stick. I have already brought this issue up with the Edge team, and a ticket has been created to fix it.

The important takeaway here is this: Microsoft is very open about what they are doing with your data. It is, however, a lot of data. Whether you are okay with that is a personal choice, which is why we will now walk you through ways of controlling your privacy and data.

Microsoft Edge

Besides opting out of targeted ads through your Microsoft account, you can also adjust some settings in the Edge browser.

  1. Open Edge Browser
  2. Tap the ellipsis button at the top right corner (the '…' button)
  3. Choose Settings
  4. View advanced settings


Here you can find a few privacy options that you can toggle on or off. Specifically:


  1. Offer to save passwords
  2. Save form entries
  3. Send Do Not Track requests
  4. Have Cortana assist me in Microsoft Edge
  5. Show suggestions as I type
  6. Cookies: Block all, only third parties, or don't block
Technically, all of those pose some privacy risk. However, only the Do Not Track (DND) requests and 'block only third-party cookies' are the ones you should turn on to reduce ad tracking. Blocking all cookies could cause login issues on some sites, so be careful if you choose that one.


The rest, including saving passwords and word prediction, do send information to Microsoft. However, the convenience of using those services is hard to give up. Regardless, the choice is yours so think it through.

Windows 10

Microsoft offers many options to control your privacy settings in Windows 10. In fact, Privacy has its own section under Settings making it very obvious where to find these things. The notion that Windows 10 and by extension Microsoft is being dishonest in any way has yet to be demonstrated. Nothing is buried, and nothing is hard to understand. Sure, you may not like some of the defaults but that is another discussion.
For now, we are going to go through the various privacy settings in Windows 10. Here is where you can find them:


All of this is rather basic. Going down further, we can see no less than 13 pages dedicated to this topic. This abundance of options is both a reflection of the amount of data Windows 10 collects and Microsoft's transparency in letting you turn things off. Here are those categories and what they do. 

General

These are the main settings for your advertising ID for apps, SmartScreen Filter, how you write, and language settings. There is also a link to manage further your Microsoft Account settings that jump to the Microsoft Choice page mentioned earlier.
Users can safely turn off advertising ID for apps and language if they have a primary language. The typing one is a bit controversial as this helps with word prediction, which is crucial for mobile. However, if you are concerned, you can turn that one off as well.
SmartScreen Filter is probably best to leave on as it helps detect malicious websites.

Location

The location info is critical for mobile devices as this how things like maps for GPS works. However, for your home PC it is not needed nearly as often. Under this area, you can turn off location for that device and even control whether location gets shared with other apps and services. Think of weather apps or restaurant finders.
Users can also clear their location history with a single button and choose which apps can use your location. There is much fine grain control here

Camera

Most computers these days have a webcam. Do you want the PC to access it? Toggle that switch here. Like location, you can also pick which apps specifically can access the camera.

Microphone

Like camera above users here can enable or disable the microphone system wide. Users can also control access through each app that requests permission.

Speech, inking, & typing

This area is controversial. On the one hand, Windows 10 and specifically Cortana collect info like "contacts, recent calendar events, speech and handwriting patterns and typing history".
At first blush, this sounds controversial. However, letting Cortana have access to your contacts and calendar is how the service enables you to send emails or reminds you of an appointment. Same thing with learning your voice patterns.
If you disable this function, you gain some privacy but lose out on Cortana. Choose wisely.

Account info

Have you noticed how some apps like MSN News show your Microsoft Account information and image? This section is where you can control that behavior. Most users want this universal login for apps, but not everyone trusts it. Switch it off if you do not want apps to access your name, picture, and "other account info".

Contacts

This one is self-explanatory. Control which apps can access your contacts. Things like Mail and Calendar, App connector, and Windows Shell Experience are the basics.

Calendar

Like microphone and camera, this setting lets you enable or disable apps having access to your calendar system wide or on an app by app basis. Once again, App connector and Mail and Calendar are the basics here.

Messaging

Windows 10 for PC currently has no way to send SMS or MMS messages through your phone. However, the feature is rumored to be coming later this year. Don't like the idea of Windows 10 accessing your SMS messages? Disable it in this area. For now, however, this does nothing as there are no apps that utilize this feature.

Radios

Some apps evidently can control your Bluetooth or other radios. This section includes a system wide switch to turn it off or on an app by app basis. Currently, we do not see any third party apps that can utilize this feature.

Other devices

This section is rather large. It lets you decide if you want your Windows 10 apps to "share and sync info with wireless devices that don't explicitly pair with your PC, tablet, or phone". Currently, this feature is not very active so you can likely turn it off for now.
Users can also control external cameras and USB access through other apps.

Thứ Tư, 23 tháng 9, 2015

How and why to use Bluetooth on Windows 10

How and why to use Bluetooth on Windows 10

We're rapidly moving from a wired to a wireless area very quickly as more people are switching to mobile devices, such as laptops, tablets, and phones, and moving away from traditional computers.

In these computing devices, we can connect all sort of accessories from headphones to speakers, mice, keyboards, and other peripherals that can connect wirelessly to virtually any device thanks to Bluetooth.

Bluetooth is now a ubiquitous wireless technology that transmit data back and forth between devices over a short distance. It allows you to get rid of cables around your desk.
Of course, Windows 10 includes support for Bluetooth. However, Microsoft is making it just a little bit easier to connect different peripherals with this wireless technology.

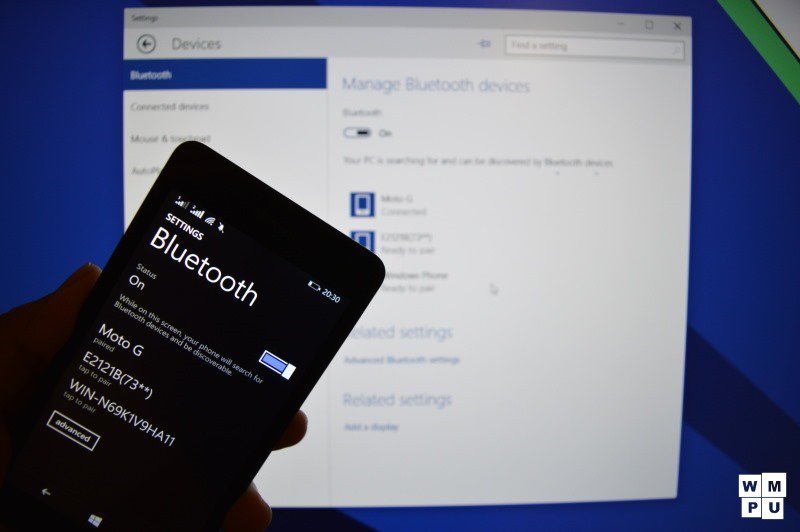
In this guide for beginners, we're going to look at how to connect any Bluetooth peripheral to your Windows 10 devices (of course, if your computer supports this type of wireless connectivity).

Connecting Bluetooth devices to Windows 10


  1. For your computer to see the Bluetooth peripheral, you need to turn it on and set it into pairing mode. It typically involves pressing and holding the Bluetooth button until you see a flashing light that indicates the pairing is ready.
  2. Then using the Windows key + I keyboard shortcut, open the Settings app.
  3. Navigate to Devices and go to Bluetooth.
  4. Make sure the Bluetooth switch is in the On position. (You'll know it is working because you'll notice the message that reads "Your PC is searching for and can be discovered by Bluetooth devices.")
  5. Select the device you want to connect and click Pair.


Once you click Pair, you're all done. Windows 10 will take care of the rest. You'll notice the "Connected" label under the device name.

Alternatively, if you're simply trying to connect a Bluetooth audio or wireless display, you can simply do the following:


  1. In the notification area in the Taskbar, click to open the Action Center button (or use the Windows key + A keyboard shortcut). 
  2. From the Quick actions area, click the Connect button.
  3. Then all the enabled devices will appear in the list, click on the device, and it should pair automatically.


Quick troubleshooting tips

If you don't see the Bluetooth section on Devices, chances are that there are issues with Bluetooth driver. Make sure to right-click the Start button, and go to Device Manager to verify the driver is present and installed correctly. If everything looks alright, but you don't see the option, you may want to download and reinstall the latest Bluetooth driver from your computer's manufacturer support website.


If the problem is with the speakers, headphones, mouse, or keyboard, make sure to turn the peripheral off, wait a few seconds, and turn it back on to try again.

Removing a Bluetooth peripheral from Windows 10


  1. Disconnecting a wireless peripheral is as easy as connecting. Just follow the steps below:
  2. Use the Windows + I keyboard shortcut to open the Settings app.
  3. Navigate through Devices and go to Bluetooth.
  4. Click on the peripheral you want to disconnect, and click the Remove button and then click Yes to confirm.


That's all there is to it.

Chủ Nhật, 20 tháng 9, 2015

Everything you need to know about Windows 10 build 10547

Everything you need to know about Windows 10 build 10547


On September 19, Microsoft released yet another preview of Windows 10 (build 10547) to the Fast ring of updates for PCs. This release is the third build the software giant releases to Insiders and the one that shows more significant changes and improvements to the Start menu, Tablet mode, Lock screen, Microsoft Edge web browser, and more.

Recently, we have also come across a few leaks that gave us an early sneak peek on the progress Microsoft is making. These changes will be included in the Threshold 2 update that is likely to roll out sometime in November. However, today we're going to focus on the changes that appear in Windows 10 build 10547 since build 10532. These changes give Insiders a better picture of what has been altered after they have upgraded from the official pre-release build that Microsoft rolled out back in August.

Below you'll find the list with all the changes incorporated in Windows 10 build 10547:

Windows 10 build 10547

Start menu

As I have done previously, I'll begin with the changes in the Start menu. For the Threshold 2 update, Microsoft is working on improving the Start menu. Currently, users can have three columns of medium sized tiles, in build 10547 the software maker is allowing users to have a 4th column of tiles.


This is a similar option also found in Windows 10 Mobile. The company is now bringing it to the desktop to allow users to fit up to 4 medium sized or two large Live Tiles per group. This feature is optional, and it can be enabled by going to Settings > Personalization > Start and enabling the Show more tiles pill switch.


This new feature is available when using the normal sizes or the full-screen version of the Start menu. It's also a welcome addition as many users had complained to Microsoft about the waste of space when using the full-screen version of the Start menu.


Windows 10 build 10547 also increases the support of tiles on Start from 512 to 2048, so you can pin plenty apps to the menu.

The Start menu also includes an updated context menu for Windows apps. For example, right-clicking Maps or other apps, you'll notice the More menu that includes the options to: "Turn live tile off" and "Unpin for taskbar", and "Rate and review" and "Share", which are two new options, but they don't seem to be working at this time.


Tablet mode

Tablet mode (Continuum) is also getting a few improvements in build 10547. In this build, Microsoft is bringing additional familiarity from Windows 8. Now, when you use Task View on Tablet mode, you can now snap apps, replace apps already snapped, and swipe the app down to close, which will be very useful for those using tablets, in particular those using a Surface Pro 3.


Lock screen improvements

In this preview, Microsoft is rolling to Windows Insiders improvements to the Lock screen. When the operating system released back on July 29, the sign-in screen featured the default background Microsoft created featuring the Windows logo made out of light.
The wallpaper was well received, and it was also featured in the desktop, but after some time everyone will just get tired of looking at the same image again and again. This complaint is one of the reasons why we have themes and the ability to change wallpapers. Unfortunately, you could change the desktop and the Lock screen wallpapers, but you couldn't change or disable the sign-in screen image.

In the new build, Microsoft is adding a new option that allows users to disable the sign-in screen background. Disabling the experience, you will end up with a solid background color that comes from your current color scheme.

Nonetheless, you still can't change the images for anything else you might like, but it's just a preview, chances are the company will include the ability to set your custom image in later builds.

If you want to disable the sign-in screen image background go to Settings > Personalization > Lock screen and turn off the "Show Windows background picture on the sign-in screen" option.

Taskbar on Windows 10

While the Taskbar on Windows 10 remains virtually unchanged, Microsoft seems to be making a few improvements on app icons. In the new build, you'll notice that the software maker is re-designing the Taskbar icons for a few of its built-in apps. This is a move from a monochrome to a multi-color design using a light-gray instead of a white color.


It's worth to point out that not all the built-in apps currently feature this new type of icon design.

New icons

While we have seen new icons in Windows 10 around the desktop environment, Microsoft didn't replace every icon in the operating system. You still can find older icons introduced back in Windows XP.
In this new version, you'll find new icons in Control Panel insider Device and Printers, in the network adapter properties, Device Manager, and other areas.


Context menus

Windows 10 has been very inconsistent on the context menu design throughout different areas of the operating system. Since Microsoft launched Windows 10, we can see different context menus in the Start menu, on Microsoft Edge and the Outlook Mail app, in the Control Panel, and in many other areas.

Since Windows 10 build 10532, the company is trying to address this issue and in the previous build, Microsoft introduced improvements to context menus. Officially in Windows 10 build 10547, we continue to see improvements. For example, now we can see that Windows 10 is moving from a white background color to light gray color, which is similar to what we see today on the context menu found in Microsoft Edge.


Apps

We have seen in leaks, but now it's official, starting build 10547, Microsoft is bringing the same opening/closing animations from desktop applications to the Windows Store apps. This change further improves the experience between the modern and desktop user-interface.


In addition, Microsoft is releasing updates for some of its built-in apps, such as Photos, Xbox app on Windows 10 with a number of features and improvements, and Outlook Mail and Calendar apps.

Control Panel

We know that Microsoft is slowly moving away from the Control Panel in favor of the Settings app. However, the Control Panel in build 10547 includes a change. Now you will notice that the Theme options are back in the same way you used to be able in Windows 8 and Windows 7.

Settings app

Interestingly enough, the Settings app in Windows 10 build 10457 gets a good number of changes.

System

On System, there is a new difference for Multitasking. Under Snap, users will find a new a very interesting feature. Now, you can configure snap so that resizing an app will also re-adjust the size of the other app -- very useful for those working with multiple apps at the same time, and it works with desktop and Windows Store apps.

The option is called "When I resize a snapped window, simultaneously resize my adjacent snapped window" and default disables the option.


Devices

On Devices, the software giant is adding the new USB page, which enables a notification if there are any problems with a USB-connected peripheral.
The option is called "Notify me if there are any issues with the USB devices connected to my PC" and default enables it.


Personalization

In the Personalization section of the Settings app there some changes to the Lock screen and Start.
Inside Lock screen, we can now see that Windows spotlight is back in Windows 10 Pro. This is a feature that will let Windows 10 automatically change images on the Lock screen using Bing images and letting you provide feedback if you like what you see on the screen.
To enable the Windows spotlight, you need to go to Settings > Personalization > Lock screen and under Background change the option from the drop-down menu to Windows spotlight. (Refer to the previous image)

Inside Start, we now see that there is a preview area just like the other Personalization tabs, and in this section is where you can enable the Show more tiles option. As I have mentioned before, this option will add a fourth column to the group of tiles to fit up to two wide or large Live Tiles in the Start menu. (Refer to the previous image)
Finally, the "Occasionally show suggestions in Start" makes a comeback in Windows 10 build 10547. (Default disables the option.)

Accounts

In the Accounts settings, there aren't changes for home users. But if your computer is part of an enterprise, school, or another organization, you will notice that now there is a section to make it easier to sign in to Azure AD and there is a new "Enroll into device management", which you will use if your network administrator recommends you to enroll your device into MDM.


Privacy

We have seen the following features in one of the leaks of the operating system, but now they officially incorporated in Windows 10. I'm talking about the Email and Call History settings.

Starting Windows 10 build 10547, users will be able to control which apps can access and send emails or access your call history. You can enable or disable these settings globally or per-app. (Default globally enables the settings.)


Update & security

In Update & security, there is a new change under the Windows Update options. Now, when you go to the update Advanced options, you're not only going to find the option to stop getting Insider builds, but you will also find the Microsoft account you're using to get new builds, and you now have the ability to swap accounts by clicking the Change button.
You can change the account for one that it's already in your system, or you can add a total different Microsoft account.

Microsoft Edge

The default web browser for Windows 10, Microsoft Edge, also get some important improvements. Perhaps the most talked about fix is the inclusion of support for Object Real-Time Communications (ORTC) API. Technology developed by Microsoft, Google and many other companies that allow real-time communication without having to require a presence of a plug-in on the web browser.

If you want to demo this new feature, you can visit this webpage. But remember that you can only call US phone numbers and only for five minutes.
Other changes include a new option in the main menu that allows Microsoft Edge to cast media to devices.


There is an easier way to access to proxy settings from the "Advanced Settings" section of Microsoft Edge that open the proxy settings in the Settings app. In the advanced settings section, there is also a "Hide my local IP address over WebRTC" option, which was available in the leaked version of the operating system, but now is available for everyone. And the web browser gets bumped to version 21.10547.0.0.

Navigating to the about:flags (experimental features) users will also found a new Media Source Extensions section that allows to enable "VP9", which will let users play videos using the open source codecs developed by Google.


Text input

In this build, there are improvements in text input panel. Now the panel expands as you write providing more space in Latin languages, and the text input panel no longer opens automatically when you're not on a tablet.

Wrapping things up

Since Microsoft released Windows 10 to the public back on July 29, users have found many different issues. The company has been proactively working to fix many of the problems by releasing new updates as soon as they were ready. This ability is the Windows as a Service model.
Now the software maker is also working a more significant update, which currently we know as Threshold 2. The changes we're seeing today and more will part of the big update that is likely to roll out to everyone sometime in November.

Source :Mauro Huculak /Windowscentral