Hiển thị các bài đăng có nhãn How to. Hiển thị tất cả bài đăng

Thứ Tư, 21 tháng 10, 2015

How to delete Windows File Explorer Address Bar History

How to delete Windows File Explorer Address Bar History

Every Windows user might have observed, whenever he clicks on the ‘down’ arrow or start typing something in the address bar field of File Explorer, a history of all previous locations and URLs appears before him. This could raise privacy or security concerns for some. All the URLs can be deleted by removing them via Registry Editor. In this post, we will see how you can remove or delete Windows File Explorer address bar auto-suggest history items from the drop-down menu.

Delete File Explorer Address Bar History


Press Windows + R to bring up the Run dialog box. Type regedit and hit Enter.
Next, in the windows that opens, navigate to the following path:
HKEY_CURRENT_USER\Software\Microsoft\Windows\CurrentVersion\Explorer\TypedPaths
Once there, select the TypedPaths entry from the list of options available.
In the right-side panel, you will see url1, url2, etc corresponding to various URLs or paths. Right-click on the one you want to delete and select Delete.
This way, you can delete one, more or all of the items.
Related tips:

If you wish to delete all address bar history, in Windows 10 you can right-click on the Explorer bar and select Delete history.


To delete all File Explorer History in Windows 10, open Folder Options or File Explorer Options as it is now called, and under the General tab, under Privacy, click on the Clear File Explorer history button.


And, well, then there are always those several free junk file cleaners that let you achieve all this and more with the click of a button.

Chủ Nhật, 18 tháng 10, 2015

How to reset Microsoft Edge in Windows 10 when things are broken

How to reset Microsoft Edge in Windows 10 when things are broken

In Windows 10, Microsoft is introducing many new features to make users more productive, such as a new Start menu, Cortana, new universal apps, Settings, which is the central place to configure the operating system, ultimately designed to replace Control Panel, and much more. The software giant is also introducing Microsoft Edge, the new default web browser built for the future web and to replace Internet Explorer (which it's still present for compatibility purposes).
Microsoft Edge is a completely new web browser with a minimal design that focus on web content, and like Chrome and Firefox, the software maker plans to match and surpass the features available from its competitors with extensions, web notes, tab preview, Cortana, and more.
While the web browser works quite alright without major problems, it's still in the early days. Some users may run into some issues, such as sudden crashes, slow performance, or simply it won't launch.
If you were running Chrome or Firefox, and you're having similar issues, you should try to uninstall and reinstall the web browser to try to resolve the problem. However, like Internet Explorer, Microsoft Edge is part of Windows 10. It's nearly impossible to uninstall the app, and even if you could, you might run into different issues.

If you are having problems with the new web browser, you can try resetting the instance of Microsoft Edge in your account to try to fix the issue you're having.
Of course, we would only recommend you do this as a last resort process, where you have tried everything else and nothing worked.

Warning: Using this guide might cause you lose your favorites, history, and settings. Before, you move forward, it's recommended that you perform a full backup or create a system restore point in case something goes wrong and to need to restore your last good known state of Windows 10.


Fixing Microsoft Edge

1- If you're running Microsoft Edge, close it.

2- Open File Explorer and type the following path into the address: 

C:\Users\UseYourUsername\AppData\Local\Packages and hit Enter. (Remember to replace "UseYourUsername" with your user account name.)


3- Select and try to delete the Microsoft.MicrosoftEdge_8wekyb3d8bbwe folder as you would with any other folder. If you get a "Folder Access Denied" prompt, simply click Continue. Also, there might be some content that you won't be able to delete. If this is the case, in the dialog box, select to skip the files.


You should be able to delete most of the content inside the folder, but if you can't right-click Microsoft.MicrosoftEdge_8wekyb3d8bbwe, select Properties, remove the check from the Read-only option, and click Apply and OK.


4- Once you've tried deleting all the content, go inside the Microsoft.MicrosoftEdge_8wekyb3d8bbwe folder and try deleting the remaining folders by selecting all the folders, right-clicking them, selecting Delete, and clicking Yes to confirm the deletion. You may notice that you can't delete AC folder, but that's alright.

5- Restart your computer.

6- Now, were going to re-register Microsoft Edge in your account. Open the Start menu, search for Windows PowerShell, right-click it from the result, and select Run as administrator.

7- Type the following command and hit Enter:
cd C:\Users\UseYourUsername. (Remember to replace "UseYourUsername" with your user account name.)

Then, type the following command exactly and hit Enter:

Get-AppXPackage -AllUsers -Name Microsoft.MicrosoftEdge | Foreach {Add-AppxPackage -DisableDevelopmentMode -Register "$($_.InstallLocation)\AppXManifest.xml" -Verbose}
If the process was completed successfully, you would see a message similar to this one:


That's all there is to it. If you want to be cautious, restart your computer one more time, and then you should be able to run Microsoft Edge again and hopefully without any issues.

Thứ Sáu, 16 tháng 10, 2015

How to configure the System Restore feature in Windows 10

How to configure the System Restore feature in Windows 10

We can safely customize many features and options in Windows without having to worry about if the next time you boot your computer will start correctly. Then there are those times when you need to modify the operating system in such a way that if you don't do it correctly, you might end up with serious problems. These problems could include not being able to boot, system stability problems, and many other issues.

This reason is why we always recommend you to protect your computer by doing a full backup of your system (or we tell you the risks involved doing a particular change). However, for years Microsoft's operating system has come with the System Restore feature, which can also help you fix your computer when things go wrong. System Restore allows you to revert the state of your computer to a previous point in time to undo changes that might have harmed your computer. These changes in the system files and settings, registry, and on installed applications. It's just like a time machine.

When enabled and configured correctly, Windows generates restore points when you install a new app, device driver, or Windows update, but, of course, you can always create a restore point manually. For example, when you want to change some of the Registry settings or install a big application.

This feature is like a backup, but not exactly, as going back in time with this feature won't affect your documents or settings prior the creation of a particular restore point. However, it will remove apps, drivers, system updates, and registry changes after the restore point was made.

Configuring System Restore hasn't been a difficult task to accomplish, but it's been a feature somewhat hidden from most users, even in Windows 10. Today we're going to go through the steps you need to follow to enable, create, and restore a system restore point in your computer.


Enable System Restore

1- Go to the Start menu, or click the search box and type Create a restore point and hit Enter to open the legacy "System Protection" settings page to configure the feature.


2- While in "System Properties" under the "System Protection" tab, make sure to check your Windows drive (typically C) has Protection turned On.

3- If Protection it's turned Off the Create button won't be available. The next step is to select the drive you have installed Windows (system) and click on the Configure button.


4- Once inside of "Restore Settings" make sure to select "Turn on system protection" to enable the feature.


Note: System Restore can only be enabled per supported drive, no per computer. If you have additional drives, you may not be able to configure them.

Under "Disk Space Usage," you can adjust the maximum storage space dedicated to storing restore points. By default, Windows only uses a small percentage of the total available storage of a particular drive, and as the reserved space fills up, older restore points will get deleted to make room for future ones.

You will also notice the a Delete button that will erase all the current saved restore points. You may want to use this option when you need to create a manual restore point, and you can't allocate more space.

5- After configuring your preferences, click Apply and then OK. Now, you'll see that under the system drive now has Protection turned On.

Create System Restore Point

Now that you have enabled Restore Point in your system, the operating system will create a restore point automatically every time a significant change happens. However, sometimes you might want to create a system restore point manually before modifying anything that you might think could cause a problem.

To configure a restore point manually, simply click the Create button, and type a description to help you identify the restore point (e.g., System Restore Point before installing X app). Then click the Create button to complete the process. (Restore points creation are fast, it shouldn't take longer than a minute.)


Using System Restore

If at any point in time, you run into issues, before using a backup or the "Reset this PC" feature in Windows 10, you can use a system restore point, which will be quicker and easier.

To undo unwanted system changes to fix your computer by going back to a previous point in time do the following:

1- Go to the Start menu, or click the search box and type Create a restore point and hit Enter to open the legacy "System Protection" settings page to configure the feature.
2- Click the System Restore button and click Next.


3- You will be shown all the available restore point available with date, description, and more importantly, you'll also see the type, which specifies if it was created manually or by the system.

As you select a restore point, you can click the "Scan for affected programs" to view the applications installed since the last restore point, which will be deleted during the restore process. Then click Cancel to go back to the wizard.


Then click Next and then Finish to begin the restore process.


Once the process complete, you will back to that point in time your system was working correctly.


Extra

Thus far, we have seen how to use a restore point when things go wrong in your system, but only when you can still operate the PC and OS. However, there will be a time when you have created a manual restore point, but your computer won't boot because a certain specific error after you have modified Windows.

In these cases, you use the system advanced options during boot to access the "System Restore". Simply, try to boot your computer three times to trigger the automatic repair environment in Windows 10, and then:


  1. Click on Advanced startup.
  2. Click on Troubleshoot, Advanced options, System Restore.
  3. System Restore will load, and you can use the previous steps from Using System Restore to restore your system.

Alternatively, you can use a bootable installation media of Windows 10 to start your system and then:


  1. Click Next, and click Repair your computer.
  2. Click on Troubleshoot, Advanced options, System Restore.
  3. System Restore will load, and you can use the previous steps from Using System Restore to restore your system.

That's all there is to it.

Wrapping things up

For years, System Restore has been a well-known feature, and it also comes as part of Windows 10. Like in previous versions, it's easy to use, but it could be somewhat difficult to find for regular users. As such, today we remind you of the feature for those times when you're eager to test a new configuration, but you don't know if it will work.

Keep in mind that this feature is not a replacement for a full backup or reset functionality. If your computer's hard drive fails, you won't be able to restore the previous version of the operating system, and you are likely to lose all your files. Also, the reset functionality built-in Windows 10 will only help when you need to reset all of your settings, apps, and operating system to the factory defaults.

Thứ Tư, 14 tháng 10, 2015

How to sift spreadsheet data using AND, OR, NOT, and XOR in excel

Excel Boolean logic: How to sift spreadsheet data using AND, OR, NOT, and XOR


Excel logical functions make it easy to find the data you want, especially in huge spreadsheets.

In Excel, Boolean logic (a fancy name for a simple condition that’s either true or false) is one way to sift specific data or results from a large spreadsheet. Granted, there are other ways to search a spreadsheet, including Lookup functions and pivot tables. The reason to bone up on Boolean logic is because it's a method you can use in other applications, like search engines and databases.

Boolean operators, which Excel calls logical functions, include AND, OR, NOT, and a new function called XOR. These operators are used between search terms to narrow, expand, or exclude your results in databases, spreadsheets, search engines, or any situation where you’re seeking specific information. We'll walk you through all four.


Boolean basics

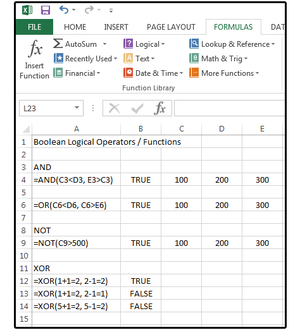
The simplest definition for each operator is this:

AND – returns TRUE if all conditions specified are true
Example: =AND (100<200, 200>100) TRUE because both conditions are true
OR – returns TRUE if at least one of the specified conditions is true
Example: =OR(100<200, 100>300) TRUE because one of the conditions is true
NOT – returns true if condition specified is NOT met (reverse logic)
Example: =NOT(100>500) TRUE because 100 is NOT greater than 500
XOR – also called Exclusive OR, returns true if either argument (but not both) is true
Examples: =XOR(1+1=2, 2-1=2) returns TRUE because one condition is true and one is false
=XOR(1+1=2, 2-1=1) returns FALSE because both conditions are true
=XOR(5+1=2, 5-1=2) returns FALSE because both conditions are false
A few more things to note:

  • When you're searching for a range of results via Boolean operators, you define the range by what it's more than or less than. 
  • Excel 2013 allows a maximum of 255 arguments in a single logical function, but only if the formula does not exceed 8,192 characters. 

Boolean operators may start out looking simple. When combined with other functions, however, such as IF statements, you can create some complex formulas that produce very powerful results.


Boolean AND, IF-AND

When you're trying to find something that meets multiple criteria, AND is your operator. For example: One of the actors in George’s play broke his leg, so George needs another actor, immediately, with very specific skills and appearance. In order to fit the costumes, the new guy must be 68 to 69 inches tall, must weigh between 180 and 200 pounds, and must be aged between 30 and 50. 

If George’s list of actors contained only 50 to 100 names, he could scan the list and locate a replacement himself. But the Guild Actors database contains 20,000 records, so he needs a faster way to narrow the search. 


For this query, you can use one of the following three formulas. All three formulas work and all are similar, except the AND statement only returns True or False. The IF statements allow custom responses such as “Match” or “Qualified.” 


Copy the database and formulas shown in figure 02 and experiment with the results.
A. AND statement using AND Boolean operators (with three conditions): returns true or false. 


=AND(AND(C6>67,C6<70),AND(D6>179,D6<201),AND(E6>29,E6<51)) = TRUE


B. IF/AND statement using AND Boolean operators (with three conditions): returns Yes or No because the IF statement says: If this, and this, and this is true, then answer Yes; else/otherwise, answer No. 

=IF(AND(AND(C8>67,C8<70),AND(D8>179,D8<201),AND(E8>29,E8<51)),”Yes”,”No”)

C. IF statement using AND Boolean operators (with three conditions): returns Yes or No.
In this case, if any of the AND statements are not met, the response will return False and the multiplication (asterisk) result will be 0 (False). This format often appears when your syntax has an error and Excel repairs it (after asking you if you would like assistance). 


=IF(AND(C10>67,C10<70)*AND(D10>179,D10<201)*AND(E10>29,E10<51),”YES”,”NO”)


Note: Notice how Excel color-codes the formulas to the matching cells, including the opening and closing parentheses, in an effort to help you understand the syntax of each condition in the formula.


Boolean OR, AND-OR

The first database search returned 1100 actors. George wants to narrow the results further, so he queries those 1100 results for two very specific skills: This actor must speak fluent Italian or French AND have a vocal range of tenor or bass. 

Use the following formula for this query:
=OR(OR(C9="Italian",C9="French"),AND(OR(D9="tenor",D9="base"))) = TRUE
Remember, for the answer to be true, the actor must speak Italian OR French AND sing tenor OR bass. 


Any incorrect information produces a FALSE response. 


Copy the database and formulas shown in figure 03 and experiment with the results. Once again, note how Excel color-codes the formulas to the matching cells, including the opening and closing parentheses, in an effort to help you understand the syntax of each condition in the formula.


Boolean NOT, NOT-OR

The easiest way to explain the NOT operator is to compare it to an Internet search. If you searched online for your old friend Jack Russell just by typing his name, you'd get hundreds of hits for dogs and puppies, too. With the NOT operator, you can search for “Jack Russell NOT dogs NOT puppies” to remove the canine variable. 

George needs some background performers to dance and play a variety of instruments—but not the piano, because pianists can't dance around, and not ballroom dancing, because he wants them to dance with their instruments, not with human partners. George queries the database again and specifies NOT piano AND NOT ballroom dancing. 


Remember, this is reverse logic, so NOT piano and NOT ballroom equals FALSE because he doesn’t want ballroom and he doesn’t want piano. Think of FALSE as “No, not this person.” Notice also that record 3 (Feyd-Rautha) says guitar and ballroom. Guitar is good, but ballroom is bad, so the response is FALSE because George doesn’t want ballroom (even though guitar is okay). Same situation for record 4 (Piter De Vries), piano, waltz. Since only one is acceptable and not both, both are rejected. 


Use the following formula for this query, then copy the database shown in figure 04 and experiment with the results. 


=NOT(OR(C5="piano", D5="ballroom"))


Meet XOR, also known as Exclusive OR Just when you thought you had Boolean logic in the bag, Excel 2013 introduced the new operator XOR, which means Exclusive OR. Think of it as a similar opposite of NOT: If one condition is true and one is false, XOR returns TRUE. If both conditions are true, or both conditions are false, XOR returns FALSE.
Use the following formula for this query and then copy the database shown in figure 05 and experiment with the results. 


=XOR(C5="piano", D5="ballroom")


Once you get comfortable with Boolean operators, you have a new skill for finding specific records in a sea of cells. Better yet, you can branch out to use Boolean logic to to refine Internet searches, database searches, and more.

Thứ Tư, 7 tháng 10, 2015

How to enter Windows 10's Safe Mode

How To Boot Into Windows 10 Safe Mode


Sometimes, whether you like it or not, you have to boot into Windows' stripped-down Safe Mode. But with Windows 10, that gets complicated. Windows’ Safe Mode provides a simple, stripped-down version of the operating system. The programs that usually load automatically when you boot Windows don’t do that here. And Safe Mode only uses the most generic drivers. Thus, Safe Mode can be a big help for diagnosing certain problems. For instance, it’s a great place to scan for malware. Plenty of discussions going around the Internet regarding Windows 10, mostly so because of how Microsoft has really revamped its latest OS setting it apart from the earlier offerings. If you’ve just moved onto Windows 10 and are experiencing boot failures due to some incompatible installations, such as drivers or apps, Safe Mode is your savior. We show you how to boot into Windows 10 Safe Mode.


But the old-fashioned way to get into Safe Mode—booting the PC and pressing F8 at the exact right moment—seldom works on PCs running Windows 10. These techniques will:
If you can successfully boot into Windows, booting into Safe Mode is relatively easy—if you know the trick.
Step1: Click or tap the Start button, and then the Power button. Hold down the Shift key when you select Restart.


Step2: In the resulting, full-screen menu , select Troubleshoot>Advanced options>Startup Settings.


Step 3: In the Startup Settings screen, tap the Restart button. The PC will reboot, and bring you to a Startup Settings screen
Step 4: Use the arrow keys on your keyboard to select Enable Safe Mode or Enable Safe Mode with Networking. But what if things are so bad that you can’t successfully boot the operating system?

Try booting anyway. If you can get to the login screen, you’ll find a power icon in the lower-right corner. The instructions above work there.
But what if you can’t get to the login screen? In that case, chances are that Windows is so messed up that it couldn’t boot into Safe Mode anyway. But here’s a trick that might work:
You’ll need the Windows 10 Recovery Drive, which you should make now, while your PC is still healthy. You’ll need a flash drive that you will use only for this purpose. Any files already on that drive will be deleted. To create the Recovery Drive, plug in the flash drive, open Control Panel’s Recovery tool, click Create a recovery drive, and follow the prompts.

You might want to test this before you’re in a difficult situation: Boot the Recovery Drive and select your keyboard layout. Then select Troubleshoot > Advanced options > Command Prompt. At the command prompt, enter these three lines, making sure to hit Enter at the end of each one:
c:
bcdedit /set {default} bootmenupolicy legacy
exit


Select Turn off your PC. Boot the computer and repeatedly press and release F8 until the Advanced Boot Options menu pops up. Then you can select Safe Mode or Safe Mode with Networking.

Or you can use

System Configuration Utility

Step 1: Right-click the Start button and select Run.
Step 2: Type msconfig in the Run box and hit Enter.
Step 3: Once System Configuration is launched, navigate to the Boot tab and check the Safe boot option under Boot options. Make sure Minimal is also selected as the sub-option. Additionally, if you wish to maintain network connectivity in Safe Mode, check the Network option.


Step 4: Once the options are all set, hit the OK or Apply button, and restart your computer, which should now boot straight into Safe Mode.

It is important to note that once you’re in Safe Mode, you will have to instruct Windows to not boot into Safe Mode upon next reboot. To do this, simply launch System Configuration again and ‘uncheck’ the Safe boot option.

Chủ Nhật, 4 tháng 10, 2015

How to customize the images, colors and borders in Powerpoint

How to customize the images, colors and borders in Powerpoint


You don't want to use the same old boring template everyone else uses in PowerPoint. PowerPoint has a great set of special effects, graphics, animations, and template themes. There’s just one problem: Everybody else has the same effects, animations, and template themes that you have. The last thing you want is to look unoriginal. Here’s how to make something unique that will help you stand out from the crowd.

Redesign an existing template

Let’s start with an easy one. On the main menu, select the template titled Crimson Landscape Design slides. The background on this slide is an image. The easiest way to customize it is to select a different image.

1. From the Design tab, click Format Background.
2. In the Format Background box under Fill, verify that the ‘Picture or texture fill’ button is selected.
3. Under ‘Insert picture from,’ click ‘Online...’. In the Insert Pictures dialog, type gradient design in the Bing Image Search box.


4. Highlight your chosen image and click Insert.

5. If you don’t like the selected image, click the Undo icon, press Ctrl+Z, or click Reset Background at the bottom of the Format Background submenu.


This straightforward gradient is simple and elegant, but you could add a few more design elements.

6. From the Insert tab, click Shapes, then select a shape from the graphic shapes list.


7. Add or draw that shape onto the slide, then click the Drawing/Format tab.
8. Select a Shape Fill from the Shape Styles group, then click Gradient from the Colors menu.


9. Choose a Gradient from the options menu or select More Options.

10. On the Format Shape submenu, click Gradient Fill, then make adjustments to the gradient on the Gradient Stops bar.

Design an original template

For original templates, the sky’s the limit—but keep these guidelines in mind to avoid common design errors.

  • You can use public domain clip art, stock images, original art and/or photography, company logos and designs, or just create slides from the PowerPoint effects.
  • Simple is elegant: Too many design elements create clutter that competes with the slideshow’s message.
  • If your design background is limited, browse thru PowerPoint’s templates online for ideas.
  • Design a theme that matches the topic and your company’s corporate identity, not your personal preferences.
  • Create a color palette for your theme. Your company’s brand colors are good place to start.


1. Open a Blank Presentation. PowerPoint's default is a blank white slide with two lines of text: Title and subtitle. Enter both, then select a font: typeface, size, and color.

More design tips:


  • You can use display fonts for titles, subtitles, headers, and subheads, but not when stacked. For example, if you use a display font for the title, use a san serif or milder font for the subtitle.
  • The title should never be more than two-thirds larger than the subtitle. [***larger how?***]

2. Continue by selecting a background color. In the Customize group under the Design tab, click Format Background. In the Format Background submenu, select Fill, then choose a color from the color palette.


3. So far, nice font, boring background. Because the company name is Starlight Tours and the subtitle is First Class Accommodations thru the Tarantula Nebula, a background image of that Nebula would be appropriate, but it might also be too busy. Try the Hubblesite gallery. You can’t resell these photos or print them onto mass produced t-shirts, but single use is okay.

Visit the Hubble site and download an image of the Tarantula Nebula. Under the Insert tab, click Pictures, navigate to the Pictures folder, select the nebula you just downloaded, and click Insert.


4. The image inserts at a reduced size. Notice that when it’s selected, the Ribbon menu displays a new tab (Picture) above the Format tab. Select this tab to display the Format/Picture menu. Next, click the handles around the picture and stretch down and over to fill the slide. If the image is disproportionate, oversize it, then use the Crop button to remove the excess.


5. You can also click the up and down arrows in the Size group, or select the tiny menu options arrow in the bottom right corner of this group to display the Format Picture submenu. Use the options on this menu to size the image more precisely.

6. Next, select Send Backward > Send to Back from the Arrange group to move the image behind the text.

Special effects

This starry background is cluttered. Text will get lost in the muddle. But if you must use this image, PowerPoint has several ways to help.

1. First, select the title (then the subtitle). From the Home tab, select Font > Bold, Paragraph > Center.


2. With the text still selected, click the tiny menu options arrow in the bottom right corner of the Drawing group.

3. On the Format Shape submenu, select Text Options.

4. Under Text Outline, select Solid line, Color: Blue, Width: 0.75 pt.


5. Click the nebula image to access the Format/Picture tab. Select the tiny menu options arrow in the bottom right corner of this group to display the Format Picture submenu. Once displayed, click the picture icon to display the Picture Corrections submenu.

6. Under Picture Corrections, adjust the sharpness, brightness, and contrast as needed.


7. Under Picture Color, set the saturation to 50 percent to fade the image and allow the background color to bleed through. This makes the text stand out more.


8. Re-adjust the size of the image under Crop, then crop again if necessary.


9. Once again, click the nebula image to access the Format/Picture menu. Select the tiny "menu options" arrow in the bottom right corner of this group to display the Format/Picture submenu. Once displayed, click the Picture icon to display the Picture Corrections/Color/Crop submenu.

10. Under Picture Color, in addition to saturation, you can also change the color tone or recolor the image—not individual objects, but the entire image, like a color screen. Just click the little down arrow in the Recolor box and select a color screen from the list.

Artistic effects

Consider using one of PowerPoint’s artistic effects to alter the image further. It’s not Photoshop, but many of these effects are similar to Photoshop’s artistic effects.

1. Select the nebula, click the Format tab, then click Artistic Effects in the Adjust group. Go ahead and experiment. It’s fun.
2. Every designer should provide the client (or the boss) with options. The long list of Artistic effects include: Marker, Chalk, Glowing Edges and more.
3. My second, third, and fourth choices were Marker, Chalk, and Glass.

Best effect plus a border page

4. After some experimenting, I chose Glowing Edges: not too busy, dark enough for the text to stand out. For the pages with body text, hoever, I needed even less clutter.


5. For the body text pages, insert a dark shape across the center of the nebula page and size it about a half-inch smaller than the page on the top and bottom. Select a black fill and a medium blue outline (match the color used on the font). This gives the illusion of a matching border for the remaining pages.

6. Enter the body text for this page, then duplicate this slide for each page in your presentation. It’s easier and faster to type over body text (with defined styles), than start with a new text box.

Thứ Bảy, 3 tháng 10, 2015

How to manage Windows 10 devices from your Microsoft account

How to manage Windows 10 devices from your Microsoft account

Windows 10 isn't just an operating system that works locally in your computer. It's also an operating system that works in combination with Microsoft online services such as with Bing and OneDrive. Furthermore, in Windows 8, the software giant introduced the Microsoft account, leaving the old time local account as a secondary option.

A Microsoft account is a fairly new account type designed to allow users to connect across devices with a single username and password. When you sign in with a Microsoft account, all of your settings, passwords, people, documents, photos and videos, and music will roam with you everywhere to any device connected to a Microsoft service.


We are no longer tied to a single device. We have multiple hardware, and every time we connect new devices with our Microsoft account, they get registered into our account. While it's great to know that we can view how many devices we are using with our Microsoft account, it's important to keep the lists under control for various reasons:


  • If you have a Windows Phone connected to your Microsoft account, and you sell it, the other person won't be able to setup the Find my phone feature until you remove the device from your account.
  • In Windows 10, Microsoft is reducing the number of devices you can install an app or game you have purchased to only ten devices. On every new install of a Windows 10 device, you have been prompted to enable sync, which creates a backup of all your settings for each computer, phone, or tablet. This "backup" also gets stored in the cloud. If you ever reinstall Windows 10, you will be asked if you want to restore the settings from a previous install. After a while, these device backups will keep piling up, using valuable OneDrive space.


In this Windows 10 guide, we're going through the steps to keep the list of devices under control.

Removing devices you no longer use

If you used to own a Windows Phone, Surface Pro 3, or any other computer, you could remove these devices by going to "Your devices" in your Microsoft account online. Simply click the Remove link, check the box confirming the device you're removing, and click Remove.

Tip: If you're removing your old phone, you may also want to check your devices doesn't have Reset Protection enable.

Avoid reaching the ten devices app and game install limit

Windows 10 limits the install of an app or a game to 10 devices. To avoid reaching the limit, you can remove devices you no longer use. Simply go to Apps & games devices, and carefully remove the devices you want by clicking the Remove link, then check the box to confirm the device you're removing, and click Remove.


Note: It's worth pointing out that you can do the same for Music, Movies & TV devices.

Deleting old device backups from OneDrive

If you want to free up some of the storage space in OneDrive, keep your device backups organized, or you no longer have one of your devices, you can go to OneDrive > Device backups, and remove old backups by clicking the Delete button.


There you have it. These tips you see today will help you to keep your Windows 10 devices under control and keep enjoying apps and games.