Hiển thị các bài đăng có nhãn Tips. Hiển thị tất cả bài đăng

Thứ Sáu, 31 tháng 7, 2015

New Windows 10 Keyboard Shortcuts

New Windows 10 Keyboard Shortcuts


Windows 10 has now been with us for a number of days with initial consumer reaction suggesting that it’s a hit with those who have already upgraded from Windows 7 or 8.1. Sitting amongst the many changes and improvements within Windows 10, comes a new focus on the desktop, and with that ultimately comes a whole new set of keyboard shortcuts for desktop users to memorize and get to grips with. As you might expect, we are right there by your side with a comprehensive list of the available shortcuts that are centric to Cortana, Activity Center, Microsoft Edge and much, much more.

Regardless of whether you’re a general user who interacts generally in the web browser, or even a hardcore user who deals with new features like Cortana, Virtual desktops, Activity Center or recording of the screen, this list should have enough shortcuts to sort out your needs.


Here’s a list of keyboard shortcuts that are new in Windows 10:
Cortana
Windows Key‌+S – Open search
Windows Key‌+C – Open Cortana in listening mode

Activity Center
Windows Key+A – Open Action center
Windows Key+V – Cycle through notifications
Windows Key+Shift+V – Cycle through notifications in reverse order
Windows Key+B – Set focus in the notification area
Virtual Desktops
Windows Key+Ctrl+D – Add a virtual desktop
Windows Key+Ctrl+Right arrow – Switch between virtual desktops you’ve created on the right
Windows Key+Ctrl+Left arrow – Switch between virtual desktops you’ve created on the left
Windows Key+Ctrl+F4 – Close the virtual desktop you’re using
Windows Key+Tab – Open Task view
Game bar
Windows Key+G – Open Game bar when a game is open
Windows Key+Alt+G – Record the last 30 seconds
Windows Key+Alt+R – Start recording (press the shortcut again to stop recording)
Windows Key+Alt+Print Screen – Take a screenshot of your game
Windows Key+Alt+T – Show/hide recording timer

Microsoft Edge
Ctrl+D – Add current site to favorites or reading list
Ctrl+J – Open downloads pane
Ctrl+I – Open favorites pane
Ctrl+H – Open history pane
Alt+C – Open Cortana
Ctrl+Shift+R – Enter reading view
F12 – Open F12 Developer Tools
F7 – Turn caret browsing on for the current tab
Ctrl+K – Duplicate tab
Ctrl+Shift+P – Open a new InPrivate Browsing window

General
Windows Key+K – Open the Connect quick action
Windows Key+I – Open Settings
Windows Key+E – Open File Explorer
Windows Key+H – Open the Share charm
Windows Key+T – Cycle through apps on the task bar
Ctrl+Shift+Esc – Open Task Manager

Thứ Tư, 29 tháng 7, 2015

How to Force Download Windows 10 Free Upgrade

How to Force Download Windows 10 Free Upgrade, Tutorial

Today is July 29, the day Microsoft launches final version of Windows 10. However unlike previous versions of Windows, Microsoft is doing a phase rollout of Windows 10 upgrade, which means not everyone will get the update on the same day.
But as they, where there’s a will, there is a way. And so if you are in the same boat as many others whose Windows 10 upgrade hasn’t automatically started downloading yet, you can follow the tutorial below to force Windows Update to download the update for you right now. I have personally tested this and can confirm it worked on my Surface Pro 3. There’s no reason why it won’t work for anyone of you on any other computer running Windows.


How to check if your PC isn’t already downloading the Windows 10 upgrade? Navigate to C:\ drive and see if it has a folder named $Windows.~BT (you may have to enable Hidden items to check this). If it is there, you are all set, but if it isn’t there, you will need to follow the instructions below to force Windows 10 downloading.

Ready? Lets do this!

Pre-requesites:


  • Must be running genuine copy of either Windows 7 SP1 or Windows 8.1 Update.
  • Must have all the previous updates installed from Windows Update.
  • Make sure your PC meets all other Windows 10 requirements, you can check those here: How To Prepare Your PC For Windows 10 The Right Way [Guide].

Step 1: Make sure you have reserved your free copy of Windows 10. If you haven’t done this already, you can follow the instructions here on how to reserve your free Windows 10 upgrade.


Step 2: Run Windows Update, and make sure you are set to receive updates automatically.

Step 3: Navigate to C:\Windows\SoftwareDistribution\Download folder and delete everything in this folder. Don’t worry, it wont ruin your system.

Step 4: Now run Command Prompt utility in Administrator mode. Simply search for ‘cmd’ from Start Menu/Screen, right click, and then click on run as administrator.

Step 5: Type this command and press enter: wuauclt.exe /updatenow.


Step 6: Now after a few minutes, check for updates in Windows Update. You should now see Windows 10 being downloaded on your PC. The size of this download will vary depending on the version of Windows you are currently running. Download time will also vary depending on the type and speed of Internet connection you have.


Step 7: Once the download is complete, it will start ‘Preparing for installation’ after which you can install the update.


Enjoy it !!!


Thứ Sáu, 17 tháng 7, 2015

5 best laptops for students 2015

10 best laptops for students 2015

The best laptops for school, for a variety of students.

Even for those who feel at home with their nose in a textbook, the end of summer break (or Winter recess) is a big bummer. But as much as it's a return to school and schedules, it's an opportunity. This is a fine excuse to invest in some fresh tech to make the coming academia-addled year a little more bearable.

If you're still reliant on a desktop, or if your laptop winces at the sight of a high-definition video lecture, it's time to look into an upgrade. And thankfully if you know where to look, it's possible to get a sleek and impressive notebook without blowing through your savings (or student loans).


We've pored through ourarchives from the past several months and picked the best laptops for school. Our short list spans a variety of budgets that range from power-sipping Chromebooks to help you with that 1,000 page dissertation to more powerful machines that'll do better at a dorm room lan party.

Update: The Dell Inspiron 13 7000 Series is an excellent candidate for students looking for an affordable, high performance hybrid convertible notebook with Intel's Core i7 processor. If you're in the market for a convertible with a larger display, be sure to read our review of the Lenovo ThinkPad Yoga 15, a notebook with excellent battery life but comes with a bit of heft. A lighter convertible from Lenovo's line would be the LaVie Z 360.


1. Asus Zenbook UX305


A most affordable and excellent Ultrabook
CPU: 800MHz Intel Core M 5Y10 (dual-core, 4MB cache, 2GHz with Turbo Boost) | Graphics: Intel HD Graphics 5300 | RAM: 8GB DDR3 | Screen: 13.3-inch FHD 1,920 x 1,080 (matte) | Storage: 256GB SSD | Connectivity: 802.11n Wi-Fi; Bluetooth 4.0 | Camera: 1.2MP HD | Weight: 2.6 pounds |Dimensions: 12.8 x 8.9 x 0.5 inches (W x D x H)

$689.99 VIEW AT AMAZON

+Solid performance
+Incredibly thin and light
-Wonky video driver
-Tinny speakers

Call it a MacBook Air knockoff all you want, the Asus ZenBook UX305 is one of the best and most affordable Ultrabooks available now.


2. Acer Chromebook 15

Chrome OS comes to the big screen

CPU: 1.5GHz Intel Celeron 3205U (dual core, 2MB cache) | Graphics: Intel HD graphics | RAM: 4GB DDR3 | Screen: 15.6-inch Full HD 1,920 x 1,080 resolution | Storage: 32GB SSD | Connectivity: 802.11ac Wi-Fi; Bluetooth 4.0 | Camera: 720p HD | Weight: 4.85 pounds | Dimensions: 15.08 x 9.65 x 0.95 inches

$289.99 VIEW AT AMAZON

+Absolutely radiant display
+All-day battery life
-Sudden crashes
-Tinny but serviceable speakers

The Acer Chromebook 15 asks if you need a big machine to just run a Chrome browser, and I say 'oh, yes.' The Chromebook 15 takes Chrome OS to new places as it's the first device to arrive with a 15.6-inch display and the first to come with Intel's newest Broadwell processor.


3. Apple MacBook Pro 13.3-inch with Retina Display

The fastest small MacBook Pro yet is a force of nature

CPU: 2.7GHz dual-core Intel Core i5 with 3MB L3 cache (Turbo Boost up to 3.1GHz) | Graphics: Intel Iris Graphics 6100 | RAM: 8GB | Screen: 13.3-inch IPS, 2,560 x 1,600 pixels | Storage: 128GB SSD |Connectivity: 802.11ac Wi-Fi; Bluetooth 4.0 | Camera: FaceTime HD | Weight: 3.48lbs (1.58kg) |Dimensions: 12.35 x 8.62 x 0.71-inches (W x D x H)

£884.00 VIEW AT AMAZON

+Retina Display
+Faster processor
-Force Touch underdeveloped
-Unchanged design

The 13-inch MacBook Pro with Retina display is an excellent option for students who may need more power than a Chromebook or a MacBook Air without sacrificing portability thanks to its long battery life, relatively light weight, and high resolution display. Students on a budget will be happy to know that they can get started right away as the MacBook Pro with Retina display ships with free copies of Pages, Numbers, and Keynote out of the box as well as iMovie, Photos, and GarageBand for basic, creative projects.

4. Acer Chromebook 15 C910

The colossus of Chromebooks

CPU: 2.2GHz Intel Core i5-5200 dual-core processor | Graphics: Intel HD 5500 graphics | RAM: 4GB, DDR3L SDRAM | Screen: 15.6-inch Full HD 1,920 x 1,080 resolution | Storage: 32GB SSD | Connectivity: 802.11ac Wi-Fi; Bluetooth 4.0 | Camera: 720p HD | Weight: 4.85 pounds | Dimensions: 1.0 x 15.1 x 10.1 inches inches

$289.99 VIEW AT AMAZON

+Fast processing speeds
+Long battery life
-Too heavy
-Awkward keyboard

Don't be fooled by this fatso. The Acer Chromebook 15 C910 is a durable workhorse that will reward you for looking past its size in favor of its performance, long battery life and stylish good looks.


5. Apple MacBook Air 13-inch

Finally, battery life within our grasp

CPU: Dual-core 1.3GHz Intel Core i5 (2.6GHz with Turbo Boost) | Graphics: Intel HD Graphics 5000 | RAM: 4GB | Screen: 13.3-inch 1440 by 900 | Storage: 128GB SSD | Connectivity: 802.11ac Wi-Fi; Bluetooth 4.0 | Camera: FaceTime HD | Weight: 2.96 pounds (1.35 kg) | Dimensions: 12.8 x 8.94 x 0.68 inches (W x D x H)

$879.00 VIEW AT AMAZON

+Fantastic battery life 
+Haswell processors 
-No Retina screen 
-Not user upgradeable

While it has yet to make the leap into Retina, this is still the laptop that the ultrabook aspires to, thanks to incredible battery life and AC Wi-Fi.

Thứ Ba, 14 tháng 7, 2015

How to take a screenshot on an Android device

How to take a screenshot on an Android device


Capture those moments that are too important (or too silly) to forget
An increasing amount of people are using their Android smartphones and tablets in place of, or at least as a capable supplement to, their laptops or desktop PCs. As the Android platform continues to receive several desktop-grade applications and functionality, it's easy to see why.


One of the cooler, more understated functions packed into Android devices is the ability to take a screenshot of its display. The process, while simple, isn't the same across every Android smartphone or tablet. For instance, the button combination on an HTC One M9 differs slightly from taking a screenshot of the screen of a Samsung Galaxy S6. Regardless of which Android phone you have, we'll break down all the different ways you can capture a screenshot.

How to screenshot on Android phones and tablets

When you have the content you'd like to capture within the frame of the display, press and hold the Power button first and then press the volume down button. Make sure not to release your finger from the Power button before you push the volume down button, or else your screen might shut off. If you've done this correctly, you'll see a brief flash indicating that the photo has been saved to your photo gallery. The HTC One that I'm using shows the saved photo in a miniature frame to indicate a successful screen capture. Your phone or tablet could do something totally different.

Take a snapshot by holding down power and pressing the volume down button

This button combination might not work for every phone out there, so don't fret if nothing is happening at this point.

Some phones or tablets require a slightly different combination of button presses to trigger a screen capture. If the above steps didn't work, try holding down the Power button first and then tap the home button on the screen. Whether the home button on your device is capacitive, meaning touch sensitive, or a physical button, this will work like a charm. This shortcut even works on Android devices that can snap photos with the Power + volume down button combo.

Press and hold power, then give the home button a tap

This function is perfect if you want to take a screen capture of Snapchat, or if you want to show your friends the high score you achieved in a game. For all matters serious or just for fun, commit these shortcuts to memory.

Thứ Bảy, 11 tháng 7, 2015

Hack Wifi thành công 100%

Hack Wifi thành công 100%

Tình hình hôm nay cái modern nhà mình bị hỏng , không có mạng mò mẫm hack wifi em hàng xóm phát ai ngờ thành công luôn. Cách này thì mình biết trên mạng khá lâu rồi , dùng JumpstartDumpper 50.5 tự động truy cập vào.

Tất nhiên mình không khuyến khích hack nhé, bạn cứ chạy sang pm biết đâu lại được làm quen với em hàng xóm luôn .


Mình cũng báo trước, qua nhiều cmt trên mạng thì pm này chỉ đạt hiệu quả tương đối, tùy theo Wps (Wifi protect setup) tắt hay mở, và loại card Wifi trong máy bạn. Anh em nào không lấy pass được thì do mình không may mắn thôi. Và mình cũng ko trả lời các cmt ko kiếm được pass wifi. Với các bạn đã lấy được pass, thì nên sử dụng có giới hạn, để chủ wifi khỏi biết, mình mới dùng được lâu dài. Các bạn bên nhà mạng có đọc được bài này thì cũng thông cảm cho anh em, khi cài modem wifi cho khách nhớ mở Wps; anh em xài ké cũng chỉ là bất đắc dĩ và tạm thời thôi.

Trước tiên bạn tải 2 phần mềm này giải nén ra và cài đặt Jumstart đi nhé.
Link download:

http://www.mediafire.com/download/7lw1fg97cf6k1bf/24hchiase.com_hackpasswifi.rar


  1. Giải nén gói tải về rồi chạy file JumpStart setup để cài đặt. 
  2. Sau khi cài đặt xong, bấm chuột phải vào icon ở dưới khay hệ thống và chọn Close.
  3. Tiếp theo chạy file Việt là xong (nhớ làm bước trên, đóng pm đang chạy nền mới chạy file Việt được. (Không cần chạy file viethoa cũng được nhé)

Bây giờ tiến hành hack pass Wifi
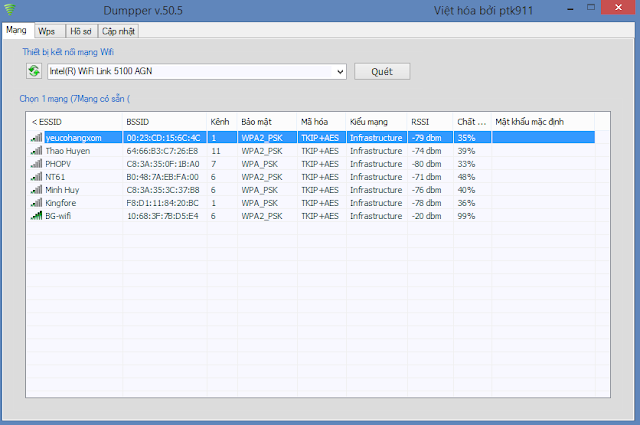
Chạy file Dumpper 50.5 Việt tải về, bấm ‘Quét’


Sau đó mở sang tab wps, chọn "tất cả các mạng wifi" rồi bấm quét


Chọn wifi nào có tín hiệu cao và nhớ là phiên bản là 00 nhé, nếu 01 thì xác định tạch luôn bỏ qua nó , với 2 phần mềm này thì 00 mới có thể dò pass.

Sau khi chọn được wifi cần tìm pass thì bạn bấm vào chạy Jumpstart , chờ khoảng 1 phút để nó tự kết nối . Nếu nó báo thất bại thì tìm wifi khác .
Sau khi kết nối được thì vào phần hồ sơ để xem pass để dùng về sau hoặc cho điện thoại.
Nếu pass là dạng hex thì bạn dùng phần mềm WiewlessKeyView của Nirsoft, nó sẽ hiện đúng password.
Chúc các bạn thành công.!!!